I once tried a natural cream for 3 thousand rubles. And I didn’t want to go back to store-bought creams for 200 rubles. But I didn’t have the opportunity to spend 3 thousand rubles on cream every month. At first I found a way out: I used natural oils instead of cream. A little later I found a neutral cream, where you could add any actives and get a cream for the desired tasks. And then I started making cream myself and so far I have no desire to try something else. The cream turns out to be very light and contains only the ingredients I need. In today's article, we'll look at how to make face cream at home, even if you've never cooked it before.
Benefits of handmade face cream
Why did I start making creams at home? At first it was pure curiosity: how to make a face cream, and will I succeed? I must say, the cream turned out right the first time. The first sensation is lightness, the absence of any irritation. Then I realized that homemade cream does not form an unpleasant film on the skin, as is the case with store-bought ones. Maybe in the hottest weather, but in such weather it’s better not to use anything at all, everything makes your skin tired.
The next advantage is an individual recipe. You create a cream recipe based on your skin's needs. The recipe may change from month to month, so the skin's needs change. We can add whatever we need to the recipe and exclude irritating ingredients. For example, I don’t use essential oils in face creams.
Another point is benefit. Having spent once on ingredients and equipment, you will constantly brew yourself luxury creams with a rich composition at a regular store price. There is no need to overpay for the brand, advertising and beautiful jars.
I'm not even talking about the effect of the cream. After all, you will only put in there what actually works and in the right doses. Knowing the exact composition, you can monitor the skin's reaction to certain components.
I also like the creative component of cream making. Come up with a product, then create a recipe yourself, prepare the ingredients, measure, mix, and at the end enjoy the pleasant aroma of the finished cosmetics. Then watch how beautifully the product is transferred into the container. This is a great pleasure for me.
Composition of phytocosmetics
The formula of the organic product is simple: oil + water + emulsifier. All handmade cream recipes are based on this.
- It is advisable to choose unrefined oils with the maximum amount of nutrients. The most popular are macadamia, avocado, coconut, shea, grape seed, rice bran, black cumin, cocoa, organ, jojoba. Additionally, antioxidant components are added (tocobiol C, rosemary extract) to prevent spoilage and rancidity.
- Purified distilled water is used.
- An emulsifier allows the oil and water to form a stable mixture. Olivem 1000 is a vegetable emulsifier made from olives. Withstands high temperatures.
Disadvantages of home cream making
There are also some disadvantages to this matter. But usually the advantages outweigh them. So these disadvantages have not yet stopped anyone from changing their mind.
Shelf life
Since natural preservatives are used in handmade creams, they do not last long. Usually this is a couple of months in the refrigerator. I brew myself 30 ml of cream for a month, and when the jar runs out, I think of a new recipe for fresh cream.
Cooking time
How to make face cream if you are at work all day? Having learned how to make cream, you will have to periodically set aside time to make yourself a new jar of cream.
Ingredient costs
First, you will have to spend money on ingredients, tools, equipment, without which it is impossible to cook the cream. Next, you just need to buy more ingredients.
You will no longer be able to use the product you purchased.
Once you try your cream, you will not want to go back to store-bought products. This means that you must be prepared to make your own cream under any circumstances.
Lots of practice
Our skin is constantly changing, and from time to time we need to solve different problems with it. Either it dries out, then pimples or wrinkles appear on it. In order to prepare a cream that solves these problems, you will have to develop more and more new recipes instead of going to the store and buying a ready-made product for the problem.
Place for ingredients
Components, jars, tools take up a lot of space at home. Usually the cream maker has half the refrigerator and half the kitchen cabinets full. You can’t go buy and put one jar of cream at home.
Failures
The cream may not work. Somewhere you may not follow the technology, or some component has deteriorated, or you may have made a mistake with the grams. As a result, the cream may separate and curl.
Contraindications and possible harm
In order not to encounter negative consequences of using homemade creams, you must strictly follow the proportions and recommendations for use.
You should exclude ingredients to which you are allergic from the composition, and also conduct a test before applying any new product to your face. To do this, the cream is applied to the inner bend of the elbow and left for a day. If there is any irritation or redness in the area covered with the prepared mixture, you will have to stop using the homemade composition.
The disadvantage of homemade face creams is rightly considered to be their limited shelf life, but there is an advantage to this. After completing the course of use, you still need to take a break and switch your attention to a new recipe to avoid skin addiction.
Composition of natural homemade face cream
Basically, creams consist of three phases: oily, water and active. By combining these phases, we get an emulsion. We will discuss below how to make face cream correctly.
Fatty phase of the cream
The fatty phase includes oils and an emulsifier. They are measured into one bowl and heated together in a water bath. An emulsifier is what will ultimately connect the fatty and water phases, so you can’t do without it. I currently use Olivem 1000 emulsifier, but there are other natural emulsifiers:
- Izinov
- Neokea
- Planta-M
- Montanov 68
- Sukragel
- Nikkomuls
- Xilians
- And others
In addition to the emulsifier, the cream needs a well-combined oil mixture. The most famous German strategy for combining oils today, the essence of which is to combine oils according to their fatty acid composition.
A balanced mixture of these acids is the key to a good cream. There are some oils that can be used alone because their fatty acid composition is already balanced. Such oils: argan, sesame, baobab, rice bran. And if you don’t yet understand combining oils, the cream can be cooked in one of these oils. And I will talk about the German strategy sometime in other articles.
Aqueous phase of cream
The fatty phase in the cream mixes with the aqueous phase. To make the cream stable, it is better to use distilled water. It is sold at gas stations and auto shops. You can also use hydrolate, but in this case it is better to cook the cream without heating.
Active phase of the cream
When we combined the fatty and water phases, the mixture emulsified and we got a base cream. Now this base needs to be “seasoned” with assets. Active components give the cream additional properties: moisturizing, nourishing, rejuvenating. Today, cream shops offer a huge selection of assets that solve a wide variety of skin and hair problems. Therefore, the question of how to make a face cream if you don’t yet have the ingredients at home automatically disappears. Despite this, you should not overdo it with assets. 1-3 active ingredients per cream is enough. Larger amounts can be added to facial serum.
Preservative for cream
The cream must be preserved. And even with a preservative, homemade cream will be stored in the refrigerator for 1-2 months. In cream shops you can find a large selection of natural preservatives or synthetic preservatives, but approved for use in natural cosmetics:
- Germal
- Sharomix
- Euxil
- Benzoate + sorbate complex
- Optifen
- Silver citrate
- Cosgard
- Grapefruit seed extract
- Leusidal
- Natisid
I did not divide here into natural and synthetic. I myself use the preservative cosgard - it is synthetic, but safe for health. Each preservative (especially natural ones) has its own application characteristics: some work in a certain pH range, some dissolve only in oils, but do not dissolve in water, there is also incompatibility of preservatives with some components. Therefore, you must carefully read the manufacturer’s description of the preservative.
Cream for problem skin
Suitable for any type of skin, it has a therapeutic effect on problematic epidermis. Relieves inflammation, peeling, redness, evens out tone, smoothes wrinkles, and makes deep wrinkles less noticeable. For the effect to become noticeable, you should use the cream daily for a month.
Ingredients:
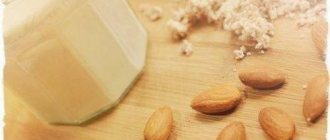
- almond oil – 35 ml;
- lemon juice – 10 ml;
- calendula flowers – 60 g;
- essential lemon oil – 5 drops;
- wax – 25 g;
- calendula oil – 22 ml.
Prepare a tincture from the flowers. Pour 250 ml of boiled water and leave for half an hour. Strain and place in the refrigerator. Separately, melt the beeswax and add the remaining ingredients. You can store the finished drug in the refrigerator. Apply for 20 minutes, rinse with warm water.
Nutritious
The homemade product works no worse than store-bought products, maintains a complete moisture balance in the cells, and promotes rejuvenation. To prepare an effective product you will need 1 tbsp. a spoonful of oils, borax, beeswax.
- Peach kernel oil;
- Olives;
- Almonds;
- Wax – 1 teaspoon;
- Borax – 2 g.
Oils and wax are dissolved over low heat. Separately dissolve borax in 1 tbsp. spoon of boiled water. Add to the main composition. To make the mass homogeneous, you need to beat with a mixer. Transfer to a glass jar with a lid.
Tools and equipment for preparing face cream
What we need in terms of tools and equipment:
2 heatproof bowls
In order to measure the fat and water phases and then heat them, we need 2 bowls or glasses. Containers should preferably be glass and always heat-resistant.
Mini mixer
It is necessary for the cream components to mix well. I usually use it when I combine 2 phases of the cream.
Mini whisk or glass rod
A whisk or stick is needed to mix the cream components after each addition.
Scales 0.01 g
Such scales are needed not only for cooking cream, but also for making all cosmetics. It is very convenient to measure the entire recipe in one unit of measurement - in grams, even essential oils or actives with a dropper. No need to calculate drops or number of spoons. The scales must be in increments of 0.01 g, because the actives are added to the cream in very small doses. For example, you need to add 0.05 g of hyaluronic acid to the cream; ordinary kitchen scales will not show this weight. I bought my scales from Aliexpress and have been using them for more than two years.
Thermometer
When we combine the fatty and aqueous phases, their temperatures should be approximately the same. It is convenient to use a non-contact laser thermometer here - just point it at a glass with phases, and it will show the desired temperature on the display. I also ordered a thermometer from Aliexpress, and it hasn’t let me down for more than 2 years now.
Alcohol or other disinfectant
Before starting work, you need to disinfect surfaces, tools, a jar of cream, and even your gloved hands. For these purposes I use formic or propyl alcohol. You can buy formic alcohol at a pharmacy; I ordered propyl alcohol (propanol) from the online store soap-formula.ru.
Cream jar
You need to prepare a jar for the cream in advance: it must be disinfected and dry. I like to use airless containers for cream. They are convenient because the cream does not come into contact with air when used and you do not have to put your fingers into the cream, introducing bacteria into it. I buy these jars in my favorite online store aroma-zone.com, they are more expensive than regular ones, but if you buy them once, you can use the container many times. If you were unable to find such a container, use a jar, but remove the cream with a clean spatula or spoon.
Plastic spoon for bulk ingredients
Some ingredients exist in dry form and must be dissolved in water before use. In this case, it is convenient to use a small spoon (such spoons are found in medicines, you can use them).
Silicone spatula
A very necessary thing! When we transfer the finished cream into a jar, we cannot remove all the cream from the walls of the bowl. And here a silicone spatula will help us. It is sold in any supermarkets or cream shops.
Latex gloves
To avoid introducing unnecessary microorganisms into your product, you need to wear gloves. In ordinary rubber ones, which are sold in hardware stores and supermarkets.
Anti-aging cream with iodine
According to numerous reviews, this composition quickly softens the skin, whitens, restores elasticity, and eliminates dryness and flaking.
The composition quickly softens the skin, whitens, restores elasticity, eliminates dryness and flaking
To prepare such a product, you need to prepare cosmetic Vaseline (1 teaspoon), bee honey (1 tablespoon), pharmaceutical castor oil (1 tablespoon) and STRICTLY 2 drops of iodine. In a glass container, thoroughly mix all components until completely dissolved.
How to make a face cream recipe
You won't be able to make real cream without a recipe. In cream making, it is very important to know, down to the gram, how much we need to add a particular component. There are a lot of ready-made recipes on the Internet, but if you take them into service, you definitely need to double-check them. It’s best to make your own recipes. Therefore, I will now tell you how to do this.
Choosing an emulsifier for cream
It all starts with the choice of emulsifier. It is the emulsifier that determines the entire texture of the cream. Usually, in the description of the emulsifier on the store’s website, the dosage of the emulsifier itself is written and how many oils we can add.
So, we take the emulsifier Olivem 1000. The percentage of Olivem introduced into the cream is 5-10% of the total mass of the cream. So how much should you choose: 5, 7, 10%? Let's take a look at this handy table:
| Olivem 1000 – percentage of input | Fat phase percentage | ||
| 10% | 20% | 30% | |
| 3% | The cream has a light texture, like milk. There is a risk of instability, you need to add 0.3% xanthan gum to stabilize | Not recommended, risk of instability | Not recommended, risk of instability |
| 5-6% | Light moisturizing fluid cream, very good stability | Cream of thick texture, very good stability | Dense buttercream, very good stability |
| 8% | Light silky cream, very good stability | Thick cream, very good stability | Thick cream, very good stability |
I took this table from the description of the emulsifier on the Aromazon website. We don’t need to invent anything, everything is already prescribed by the manufacturer. So, from this table we see how much olive and oils you need to take to get a stable cream. Only 3% of the emulsifier is used to prepare a light milk - this can be a moisturizing body lotion. With such a small percentage of emulsifier, a small amount of xanthan gum is required to stabilize the emulsion. The best cream is obtained when 5-8% olivem is taken. We will take the average value, where 5% emulsifier and 20% oils are required. You will get a good cream of medium thickness. You can take argan oil, as long as we don’t know how to make competent oil mixtures
We have a recipe for the cream:
- Olivem 1000 – 5%
- Argan oil – 20%
Choosing assets for cream
To make the cream have additional properties, we will add a couple of moisturizing assets. All skin needs hydration, not just dry skin. From all the variety, let’s take natural moisturizing factor (nuf) and provitamin B5. These 2 assets are universal, they can be added to any cream. You can also take anti-aging assets. The percentage of assets is also written in their description: for provitamin B5 it is 2-5%, for nuf it is 1-3%. If you are using these assets for the first time, you need to start with a small dosage and check the skin reaction. I usually take average values: provitamin B5 3%, nuf 2%.
The recipe for our cream is now like this:
- Olivem 1000 – 5%
- Argan oil – 20%
- Provitamin B5 – 3%
- Nuf - 2%
I will explain how to convert percentages to grams below once we get the full cream recipe. Now we need to add a preservative. I use cosgard, its dosage is 0.2-1%, the manufacturer recommends taking 0.6%, so that’s what I add.
And we have the last component left - water. We take enough water to make 100% of the product. We need to add up all the percentages and subtract them from 100. We get 100% -30.6% = 69.4%. As a result, 69.4% of water comes out.
Full face cream recipe
Now our recipe is complete:
- Olivem 1000 – 5%
- Argan oil – 20%
- Provitamin B5 – 3%
- Nuf - 2%
- Preservative - 0.6%
- Water - 69.4%
For convenience, cream makers write the recipe this way:
Fat phase:
- Olivem 1000 – 5%
- Argan oil – 20%
Water phase:
- Water - 69.4%
Active phase:
- Provitamin B5 – 3%
- Nuf - 2%
- Preservative - 0.6%
This way you can see what is included in which phase, what percentage each phase is.
Rejuvenating cream with rosehip
You will receive a cream completely ready for use, which is suitable for dry and sensitive skin
In addition to active antioxidants, rose hips contain microelements, as well as peptides that renew and restore the structure of skin cells.
You need to prepare finely chopped rosehips (3 tablespoons), honey (1 teaspoon), raw egg yolk and a tablespoon of butter, previously melted. By thoroughly mixing and grinding the mass until smooth, you will receive a cream completely ready for use, which is suitable for dry and sensitive skin.
How to convert percentages to grams
How to make a face cream if you have a recipe, and it’s all in percentages. We need to decide how many grams of cream we need. For example, 30 g of cream is enough for me for a month. I don’t cook large quantities, but prepare a new portion each time. Now we remember the 6th grade mathematics, the topic is “Proportions”. Let's take 30 grams of cream as 100%. To convert all the components in the recipe into grams, you need to multiply the percentage of the ingredient by 30 grams of cream and divide by 100%. This is what we get:
- Olivem 1000 - 5*30/100=1.5 g
- Argan oil – 20*30/100=6 g
- Water - 69.4*30/100=20.82 g
- Provitamin B5 - 3*30/100=0.9 g
- Nuf - 2*30/100=0.6 g
- Preservative - 0.6*30/100=0.18 g
Just in case, we check by addition: 1.5 + 6 + 20.82 + 0.9 + 0.6 + 0.18 = 30 g. So, we calculated correctly.
Now you understand why recipes are written in percentages. It’s convenient for me to perceive the recipe as a percentage. This way I can see how thick the product will be (due to the percentage of emulsifier and oils), what consistency it will be, whether it will foam, if it is shampoo, etc.
Herbal night cream
The recipe for this product is described in a romance novel, where the heroine at the age of 43 looked 30. Regular use of the product before bed evens out the tone, makes the skin fresh with a blush on the cheeks, without wrinkles and sagging.
- Chamomile infusion – 10 ml;
- Sea salt – 15 g;
- Olive oil – 15 ml;
- Yolk;
- Liquid honey – 0.5 teaspoon;
- Cosmetic Vaseline – 3 teaspoons.
Combine the yolk with almond oil. Add sea salt, chamomile, and honey. Separately, melt the Vaseline and combine with the main part. Transfer to a glass jar and place in the freezer.
How to make face cream - step by step instructions
So you and I got the cream recipe and learned how to convert percentages into grams. Of course, this is only a basic recipe, it can be further refined: include a well-formulated oil mixture in the fatty phase, add active ingredients.
Now let's start preparing the cream. Before making face cream or starting anything at all, you need to disinfect the work surface, all tools and the jar where we will transfer the cream. Now let's start measuring the ingredients. We measure the fat phase ingredients into one bowl: oils and emulsifier, and water into another bowl. Place both bowls in a water bath and heat to 70 degrees. To measure temperature, it is convenient to use a non-contact laser thermometer pistol. Once the contents of the bowls reach the desired temperature, pour water into the oil and mix vigorously. The phases merge and an emulsion is obtained.
It is more correct to pour oil into water when preparing direct emulsions. But with olivem you can do the opposite - everything mixes well anyway.
Some emulsifiers allow you to make emulsions in one bowl. That is, the fatty and water phases are placed in one bowl and heated together.
After we have made the base cream, we need to wait a little for it to cool. The temperature should be no more than 40 degrees to start adding active ingredients. Next, we begin to add the remaining components one at a time, mixing well after each addition. We also add a preservative.
Multivitamin anti-wrinkle cream
To collect all the components for its preparation, you will have to work hard, but the result is worth it!
You will need: fresh rowan leaves (3 pieces), currant leaves (8 pieces), nettle (5 pieces), jasmine and red rose flowers (3 pieces each), fresh parsley (50 grams), beeswax (1 tablespoon) , 1 ampoule of vitamin A, vegetable oil and melted margarine (1 tablespoon each).
First, all the plant components are ground in a blender until a thick and homogeneous paste is formed. Then add melted wax and the remaining ingredients to this mixture and mix the composition thoroughly again.
Rejuvenation and healing
There is another cream that can rid your facial skin of wrinkles and restore it to its former youth. The cream is prepared from the following components:
- honey (half a teaspoon). Any honey is suitable for the cream;
- quail egg yolk (one yolk is enough);
- chamomile decoction (no more than two teaspoons required);
- Vaseline (also two teaspoons). Vaseline for the cream is bought at the pharmacy;
- sea table salt (one teaspoon);
- olive oil (two teaspoons).
Rejuvenation and healing
The listed components must be carefully moved. The number of components mentioned above in parentheses is calculated to prepare the cream for one time. If the cream remains after use, it is recommended to place it in the refrigerator. Otherwise it will spoil. It also doesn't last long in the refrigerator. No more than three weeks.
It is advisable to use the cream in the evening. The cream should remain on the face for no more than 30 minutes. After half an hour, the cream should be washed off. Mineral water is suitable for these purposes.
Description and benefits
Today, hydrophilic oil is used not only to remove makeup and cleanse the face, but also as an intimate hygiene product, a natural replacement for shampoos and shower gels.
Hydrophilic oil is a mix of oils and water. This universal cleanser is a breakthrough in cosmetology. It is used to cleanse the skin of the entire body, carefully removing not only dirt, makeup, and most importantly, removing excess oil from the pores. In this case, the product is easily washed off with plain water.
You will learn how to make hydrophilic oil with your own hands from the video.
In order to achieve the ideal balance of water and oil, a special emulsifier was added to their mixture, which not only allowed the oil to merge with water, but also ensured the complete removal of its residues from the skin and its deepest pores.
This third ingredient, as a rule, is polysorbate, which, depending on its type, can be one of the acids of natural oils. Like almost any cosmetic product, it has a number of undeniable advantages:
- This is the most natural of all skin cleansers available today.
- You can purchase or make your own hydrophilic oil that is suitable specifically for your skin type.
- The principle of action is to apply the product to dry skin, which breaks down and removes dirt while rinsing with water. This allows you to avoid the feeling of tightness or a greasy shine on your face, as often happens when using other products.
- Unlike other cleansing cosmetic mixtures, this one can be prepared at home yourself and without unnecessary hassle.
To prepare the product, you must use an emulsifier, base oil and essential additives to it.
Best Recipes
Before you start preparing this cleanser, you need to remember that for one part of the emulsifier, 9 parts of base oil are required. As for adding essential extracts, only a few drops are required, depending on the specific recipe. All the recipes described below are suitable for all parts of the body, including washing your hair.
- We make a hydrophilic mixture without using polysorbate. To do this, mix olivderm and grape seed extract in the previously indicated proportions, and also add three drops each of tamanu and lemon extract.
- For dry skin, a mixture of almond oil and polysorbate - 80 is suitable, to which 1 ml of lemon and neroli extract are added.
- 90 g of base is mixed with 10 g of emulsifier and stirred well, and 5 g of lemon or tea tree essential extract is added. This hydrophilic mixture is ideal for oily skin and hair.
- For combination skin, you can prepare a product consisting of an emulsifier and peach oil, with the addition of 3 drops of essential mint extract per 50 g of the mixture.
Based on these recipes, you can prepare a huge variety of hydrophilic oils to suit your taste and color. But it is not enough to make such a product; it must also be stored and used correctly.