Causes
The following reasons can lead to the formation of such an aesthetic defect:
- heredity;
- genetic predisposition;
- age-related changes in forehead tissue;
- age-related changes in the fatty and subdermal layers;
- relaxation of tissue connections;
- decreased muscle tone: frontal, procerus muscles, orbicularis oculi muscle;
- amyotrophy;
- muscle relaxation;
- gravitational influences on tissue;
- hyperelasticity of connective tissue (congenital);
- various injuries to the facial nerve (especially its frontal branch);
- degenerative processes in the bones of the skull;
- hyperactivity of the muscles of the forehead, bridge of the nose and orbits;
- adverse environmental influences (insolation, pollution, etc.);
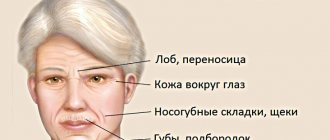
- formation of wrinkles in the bridge of the nose and forehead;
- formation of pigmentation.
Types of eyebrow drooping
| Eyebrow drooping | Features of the defect |
| Complete | the eyebrow moves completely down, hanging over the upper eyelid; |
| Partial | one of the sections of the eyebrow hangs over the upper eyelid, for example, the outer edge (towards the temple); |
| True | the lower edge of the eyebrow lies below the eye orbit; |
| False | triggered by relaxation of tissue connections; |
| Unilateral | the defect is typical for one side of the face; |
| Two-way | symmetrical defect characteristic of both eyes. |
Symptoms
The clinical picture characteristic of this cosmetic defect begins to develop gradually after 30 years. As a result of a number of reasons, partial or complete drooping of the eyebrows may occur.
The following symptoms are typical for drooping eyebrows:
- visual decrease in eyebrow level;
- reducing the distance between them;
- reducing the distance between the eyebrow and the ciliary edge of the upper eyelid;
- drooping on the upper eyelid;
- upset and tired appearance of a person;
- the face becomes dull and tired;
- a visual obstruction arises, which leads to a limitation of the field of view;
- possible severe decrease in visual acuity;
- facial asymmetry may occur;
- orbital fat may protrude;
- an abnormal eyelid fold develops;
- ptosis of the eyelid (drooping);
- tension and its elevation of the eyelid (retraction);
- the lacrimal gland descends;
- orbital fat hernia.
How to do it yourself
Masters can easily determine the type of oval and master various techniques for creating a curved eyebrow type:
- regular makeup with pencil;
- coloring;
- plucking;
- microblading;
- tattoo
You can make curved arched eyebrows at home using high-quality cosmetics, following the instructions step by step. Benefits of doing it yourself:
- saving time - you can do the image at any convenient time;
- saving money - no need to pay for the procedure;
- the opportunity to experiment - select options for curved lines, shades for a bright effect;
- convenience - having learned how to shape and correct eyebrows, you can not depend on salons.
What tools and products will you need?
Typically, among the brand's decorative products there is an extensive line of products of different textures for home design of eyebrows in the form of curved arches:
- eyeliner;
- pencil;
- shadows;
- paint for curved shape;
- eyebrow powder;
- tone;
- wax;
- mascara;
- gel.
Necessary accessories: tongs, tweezers, brush, cotton swabs, discs.
Drawing and plucking
Not all women have naturally thick eyebrows of the correct contour. Most girls take care of their hair condition on their own.
Step-by-step care:
- Determining the type and width of a curved line based on face type.
- Preparing the skin for hair plucking.
- Eyebrow plucking.
- Drawing an arc.
- Add pigment if necessary.
- Correction.
When giving your eyebrows a curved shape, you need to follow the following rules:
- Hairs can be removed from the lower part, but do not touch the upper ones, otherwise you can get the effect of angry, frowning eyes.
- Unnecessary hairs are plucked in the direction of growth. If the structure of the bulb is disrupted, hair growth will become disordered, and the eyebrows will look sloppy and incorrectly curved.
- Before the procedure, you need to disinfect instruments, tweezers, and forceps with alcohol.
- Wipe the skin with alcohol, hydrogen peroxide or Chlorhexidine solution before and after pulling out hairs.
- Carefully pluck your eyebrows in the area of the bridge of your nose. For girls with dark hair in this area, it is better to use depilatory products or sign up for a procedure with a specialist.
- Wax or eyebrow gel will help deal with unruly hairs and fix them in a curved position.
If the natural thickness and color of the hair is not enough, decorative products are used after plucking. The classic curved shape is drawn step by step according to the instructions:
- Place an eyebrow pencil or a cotton swab at the side of the nose at a right angle. The point of intersection of the stick with the line of hairs marks the beginning of the arc, its widest point.
- Move the stick onto the straight line formed by the points: wing of the nose - pupil - eyebrow to find the top of the curved contour. The smoothness of the fracture depends on the type of appearance.
- The end of the arch is determined by an imaginary segment from the wing of the nose to the corner of the eye. This will be the narrowest section.
- The approximate distance between the eyebrows is up to 3 cm.
- Start drawing a curved line from the highest point of the break, shading the pencil in both directions. If you start from the bridge of your nose and focus on this area, you can get the effect of a heavy, squinting look, and the contours will look unnatural.
Adding pigment
The following products help give a natural color to arched eyebrows:
- gel;
- pencil:
- shadows;
- powder;
- tone.
The colored gel maintains the arched shape of the eyebrows and corrects the color. The advantage of this tool is its ease of use. It is enough to apply the product to your index finger and carefully outline the line formed after plucking. The gel is suitable for thick hairs of any color and fixes their shape in a minimum time.
If there are not enough hairs, a pencil will help - mechanical or simple. The main rule for choosing a tone is that the pencil should not be darker than the color of the hair on your head.
You need to check the color and quality of the product in natural light.
The color is applied with short, confident strokes that imitate natural eyebrows, in the direction of growth - vertically at the bridge of the nose, with a slope at the break, horizontally or diagonally at the end of the curved line. The paler and finer the natural hair, the more layers of makeup you need.
The main rules for drawing curved features:
- The pencil must be sharpened.
- Avoid a continuous line along the contour.
To add color to the shadows, use a diagonal brush or stencil. The technology for applying with a brush is the same as when drawing with a pencil: follow the direction of hair growth, avoid continuous lines. Movements should be light, the color intensity distributed along the gradient - the most saturated, dark area at the break, towards the bridge of the nose and towards the tip - shading. Powder or tone under the eyebrows gives a natural look.
How to choose a pencil or eye shadow color for curved arcs:
- black is suitable only for brunettes;
- dark brown, with a reddish or copper tint - for chestnut, dark brown, light brown hair;
- light brown suits blondes.
A popular way to add expressiveness to eyebrows is tinting.
Please note that regular hair dye cannot be used, only specialized products.
Need advice from a beauty expert?
Get advice from a beauty expert online. Ask your question right now.
ask a free question
Before use, you need to check for allergies to the components of the composition.
Before painting, the curved shape is carefully adjusted.
You need to pluck the hairs and dye them as carefully as possible; in case of failure, you will not be able to wash off the applied pigment.
The brand and color must be chosen taking into account the fact that the saturation of this product is higher than that of a pencil or eye shadow.
Diagnostics
If such a defect occurs, you should make an appointment with a plastic surgeon. Consultation with a cosmetologist is necessary. The specialist will conduct an initial examination and assess the degree of eyebrow drooping. During diagnosis, an anamnesis is taken and the volume of excess skin, the fullness of the upper eyelid, and the presence of a protruding orbital hernia are assessed. The following test is also carried out: the eyebrow is pulled upward (the eyelid is raised), and the fingers of the other hand press through the lower eyelid onto the eyeball. Sometimes, with severe drooping of the eyebrows, a consultation with an ophthalmologist is necessary, who may prescribe additional diagnostic tests.
This cosmetic defect is diagnosed during an initial examination by a specialist and does not require special examinations.
Non-surgical correction methods
When turning to a plastic surgeon, patients most often complain not only about a cosmetic defect in the eyebrows, but also about the condition of the skin and soft tissues of the face. The greatest effect is achieved by simultaneous rejuvenation of several areas of the face at once.
READ ALSO: When you have a runny nose, your forehead and eyebrow hurt: possible causes of pain and accompanying symptoms, pain relief at home and treatment methods
Methods for correcting cosmetic defects include:
- Botox. Botox injections can raise eyebrows by several millimeters. The effect of this correction lasts about six months, then the procedure is repeated again. Botax preparations contain a substance that blocks the transmission of nerve impulses. The substance is obtained from bacteria, it is a protein and a type A neurotoxin.
- Eyebrow lifting (bio-reinforcement). This type of lifting stimulates the production of collagen fibers. Carried out using injections, it helps create a supportive mesh for the skin using fillers with hyaluronic acid.
- Eyebrow lifting (thread). A beautiful eyebrow shape is created using spiral mesothreads. The threads are made of a special material that completely dissolves after six months. The spiral state of the thread causes it to stretch the tissue and raise the eyebrow, and the threads also contribute to the production of structural proteins. Threads with polylactic acid from caprolactone are used for serious defects of ptosis of the eyebrow. The ideal eyebrow shape lasts for about two years.
Treatment
This aesthetic deviation is treated surgically. Before planning the operation, the plastic surgeon assesses the patient’s health status, age-related skin disorders of the forehead, temporal region, eyelids, eyebrows and cheeks. It is imperative to assess the condition of the lacrimal apparatus of the eyes. Then computer modeling is carried out.
Methods used to remove drooping eyebrows:
- Plastic surgery. It is carried out to tighten the skin in the forehead, temporal region, and eyebrows. The plastic surgery option depends on the degree of prolapse.
- Temporal lift – used for older and middle-aged patients. It is used for isolated ptosis of the tissues of the temporal region of the eyebrows.
- Endoscopic lifting – used for severe ptosis.
- Coronal or classic lifting is performed for severe wrinkles and obvious asymmetry.
- Upper 1/3 face lift.
- Brow lift – performed through an incision.
- Transpalpebral fixation of the eyebrow - carried out through the upper eyelid.
- Laser and chemical peels.
What does eyebrow expression express?
. Moreover, the most expressive means is a smile.
.
. – . The threat is indicated by a smile with wide open eyes, which widen even more with every second.
When surprised, a person opens his eyes wide and raises his eyebrows, causing wrinkles to appear on the forehead. . . .
. .
"Are you serious". .
How much does it cost to correct drooping eyebrows? Prices in Moscow
| Methodology | Price from |
| Transpalpebral fixation of the eyebrow/excision of the bridge of the nose muscles | 16,700 rubles/50,000 rubles |
| Coronal brow lift | 55,000 rubles |
| Endoscopic brow lift | 65,000 rubles |
| Eyebrow lift with mesothreads (tips) | 2,800 rubles (4 threads per eyebrow) |
Learning to raise eyebrows without using your hands
Method number 1.
Important! It is important that you are alone in the room during the brow lifting session. Otherwise, you won’t be able to concentrate and all attempts will be in vain.
First, you will have to try and give your face a sullen, offended expression. It is in this position that the muscles responsible for raising the eyebrows can be perfectly felt. When both eyebrows are tense, one of them should be relaxed and try to move it slightly. The other eyebrow should remain completely still at this time.
This method cannot be called the best, but still, by using it, you can master the skill of controlling the muscles responsible for the movement of the eyebrows. If you manage to move one eyebrow, then the facial expression can be simplified so that it does not seem so funny.
Method number 2.
Another method is the complete opposite of the previous one. However, it is considered one of the most effective methods.
- First you need to prepare a mirror and decide which eyebrow will be working.
- Both eyebrows must be raised using your fingers. When you reach the desired height, release one hand and continue to hold the other.
- It is recommended to stay in this position for several minutes every day until the expected effect is achieved.
- By the way, the stage with raising both eyebrows can be skipped if desired. You can raise one of them to the required height.
- Feeling that the moment has come and you are ready, you need to release your fingers and keep your eyebrow motionless at this moment. If you can’t hold it, it means you’re not ready yet and you should continue training.
Method number 3.
As usual, you will need a mirror. It should be placed in front of you. As in the previous methods, you must first select the eyebrow to work with.
Frown your face. After this, you need to try to pull your chin down. You should feel the forehead muscles. In such a situation, the eyebrows themselves will begin to rise involuntarily. Sometimes it will be possible to raise only one of the eyebrows. This is the situation you should remember well.
Method number 4.
The following simple technique is very effective. First you need to sit in front of the mirror. Look at the working eyebrow and give your face an offended expression. Hold on like this for about 4 seconds. After this, make a surprised expression on your face and freeze for another couple of seconds. Then these two expressions are alternately changed one after another. Such training should teach how to perform movements on one half of the face. The result of such actions will be the ability to raise one of the eyebrows without much difficulty. Continuing to practice in front of your reflection in the mirror will lead to the fact that you will be able to determine the correct muscle movement and learn to control one eyebrow.
Method number 5.
You can resort to a method where instead of fingers you use a wide piece of tape to fix one of the eyebrows. This opens up the opportunity to train both eyebrows in turn or, after practicing with one, to work on the other.
Learning something is not that easy. There are many ways to master the ability to regulate eyebrow movements. If desired, everyone can find their own method and achieve the expected result.
how to learn to write beautifully with a fountain pen
Training eyebrows using hands
First of all, you should decide which eyebrow has a dominant function; it is easier to train. You can do this as follows:
- You need to stand in front of the mirror and try to raise one of your eyebrows. After this, do the same manipulations with the other eyebrow. Whichever one you feel more control over is the dominant one. You should start training her.
- If you couldn’t feel which eyebrow has more control, then you can choose any one and perform actions on it.
Once you have decided on your dominant eyebrow, you can begin the exercises. First, the dominant eyebrow is raised and held with the hand. If the other eyebrow also begins to rise, then you need to lower it with your free hand. It is better to do training in front of a mirror. In this way, it will be possible to remember the correct movement of the muscle mass when raising one of the eyebrows upward.
If, for added convenience, you want to attach tape to your raised eyebrow, for God’s sake. This will guarantee even greater control over the muscles and provoke prompt decision-making in the process of performing actions.
While the eyebrow remains raised, use your fingers to feel the muscles located near the brow bone. They should be in a tense state. These are the muscles that you will have to rely on when raising your eyebrows. If in the first stages you have to help yourself with your fingers, it’s okay. Such actions will be an excellent method for remembering the place where the muscles are located in the eyebrow area.
It is advisable to carry out such training daily for 2-5 minutes.
After practicing raising one eyebrow, you can begin training actions to lower the other. While the raised one is held with your hand, you should try to quietly lower the other one.
It is quite possible that someone will not be able to achieve raising one eyebrow in isolation, that is, without helping with their hands. However, in order to be sure whether this is your case or not, you need to practice enough.
how to learn to read lips on your own